Introduction
In this tutorial, we will learn about how to install Kali Linux 2023.3 on VirtualBox using 7 simple steps. We will understand the basic of Kali Linux and then we will dive into complete installation process of Kali Linux 2023.3. Let’s get started.
Kali Linux Overview
Kali Linux is a specialized and widely used Linux distribution for penetration testing, ethical hacking and cybersecurity tasks. It provides a comprehensive set of tools and resources for security professionals, penetration testers and security enthusiasts to assess, audit and secure computer systems and networks. Kali Linux is known for its extensive collection of pre-installed security tools and its user-friendly interface, making it a popular choice for cybersecurity professionals and enthusiasts.
![How to Install Kali Linux 2023.3 on VirtualBox: [7 Simple Steps]](https://www.linuxnasa.com/wp-content/uploads/2023/09/kali-linux.jpg)
How to Install Kali Linux 2023.3 on VirtualBox: [7 Simple Steps]
Also read: How to Install nslookup on CentOS 7: [5 Easy Steps]
Prerequisite:
- VirtualBox Installed
- Minimum 2GB RAM
- 30GB free disk space
- 1 CPU core
Step-1: Download Kali ISO File
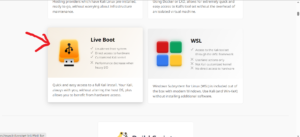
In this step, download the Kali iso file from www.kali.org. Open the link and scroll down to select ‘Live Boot’ as shown below. Click on Live Boot.
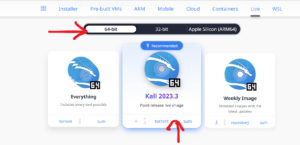
Next, Select 64bit/32bit depending on your Window’s Operating System type. Click on Kali 2023.3 to start downloading the .iso file as shown below. The size of the file is around 4GB so it will take a while to finish the download.
Step-2: Create Virtual Machine
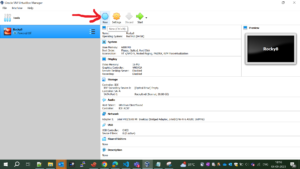
In this step, open the VirtualBox to create a Virtual machine in which we will add the Kali Linux .iso file in the next step. Click on new button as shown below.
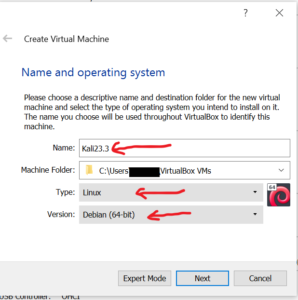
Next, give a name to your machine. I have named Kali23.3. Select Type as Linux from the drop down. Select Version as Debian (64-bit) (if you have downloaded Kali Linux 64-bit) from the drop down since Kali Linux is based in Debian. Once all done, Click on Next as shown below.
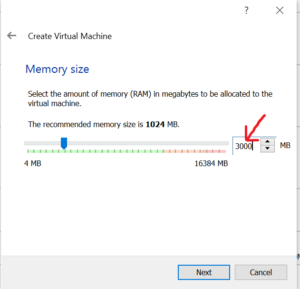
Next, allocate memory to your virtual machine. I have 16GB of RAM so I have allocated 3GB of RAM to my virtual machine. Once done, click on Next as shown below.
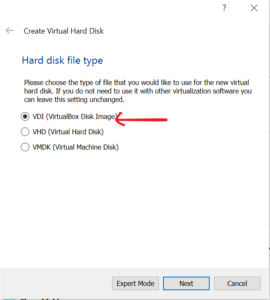
Next, Click on ‘Create a virtual hard disk now‘ and then select ‘VDI’ as hard disk file type. Once done, click on Next as shown below.
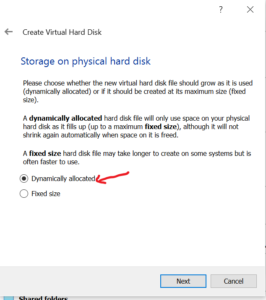
Next, select ‘Dynamically allocated’ as storage type on physical hard disk and click on Next as shown below.
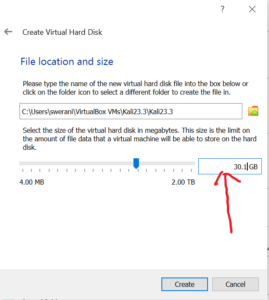
Next , allocate memory to your virtual machine between 30-35GB depending on how much memory is available in your host machine. Once done click on ‘Create’ button as shown below.
Step-3: Add ISO file to Virtual Machine
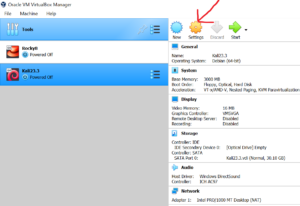
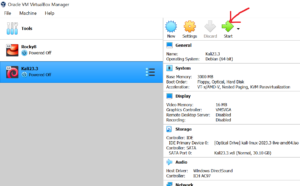
In this step, add the .iso file to the Virtual machine which was created in step-2. Select the virtual machine created ‘Kali23.3′ and click on settings as shown below.
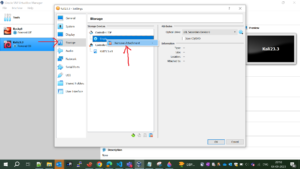
Next, Click on ‘Storage’ and delete the ‘Empty’ file by right clicking on it as shown below.
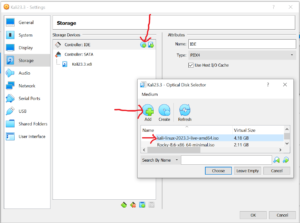
Next, Click on ‘Adds optical drive‘ button then click on ‘Add‘ button and provide the Kali Linux .iso file path. It will automatically select the .iso file once the path is provided. Once done click on ‘Choose’ as shown below.
Step-4: Start Kali Linux Virtual Machine
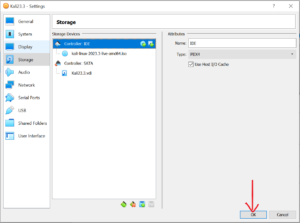
In this step, once .iso file is selected, click on ‘Ok‘ button to add this as Operating System to the virtual machine as shown below.
Next, click on the start button to start the installation process of Kali Linux operating system in the virtual machine as shown below.
Step-5: Install Kali Linux in Virtual Machine
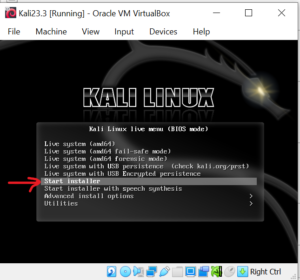
In this step, once you hit the ‘start‘ button, a pop up will appear on your screen. Select ‘Start Installer’ by using up and down arrow keys in your keyboard and hit the ‘Enter‘ key as shown below.
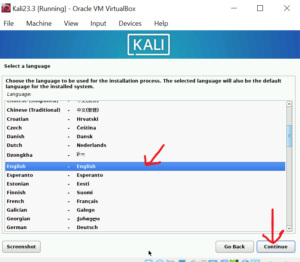
Next, select any language you prefer and click on ‘Continue‘ . Similarly select the location and again click on Continue as shown below.
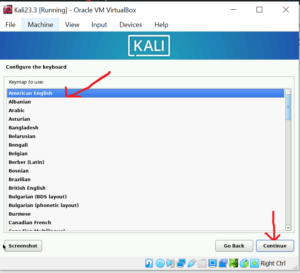
Next, select ‘American English‘ , this is for your keyboard configuration and click on ‘Continue’.
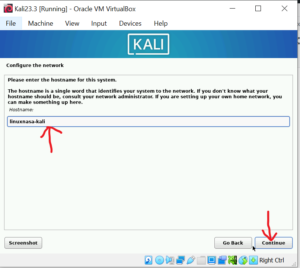
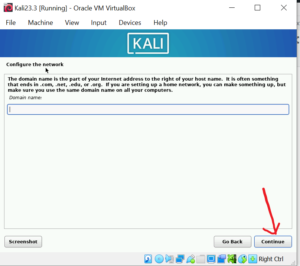
Next, give the hostname to your virtual machine. Host name is the single word that identifies your system in the network. I have given the name ‘linuxnasa-kali’. Once done, click on ‘Continue‘ button. Next, it will ask for the ‘Domain name‘, leave this blank and hit the ‘Continue’ button as shown below.
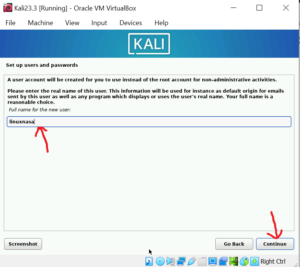
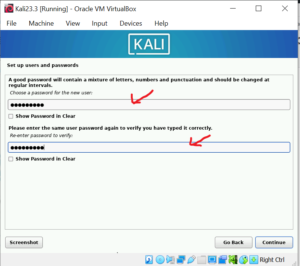
Next, create a new user for all non-administrative task. I gave given the name ‘linuxnasa’ for new user. Click on ‘Continue’. Next, it will ask you to setup password for the new user. Set the password as shown below.
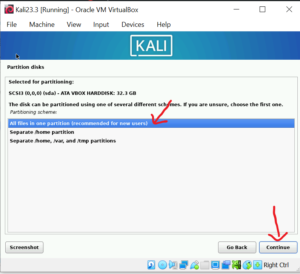
Next, select the time zone and click Continue. Next, select the installer guide and again hit the Continue button as shown below.
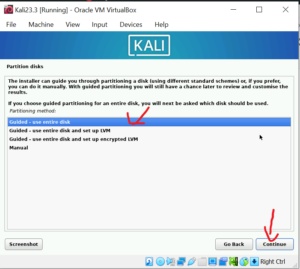
Next, select partition disk and hit Continue button as shown below.
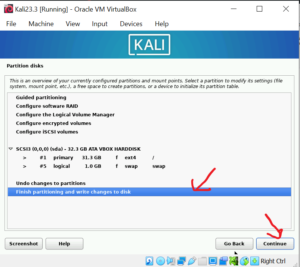
Next, select ‘Finish partitioning’ and hit Continue button as shown below.
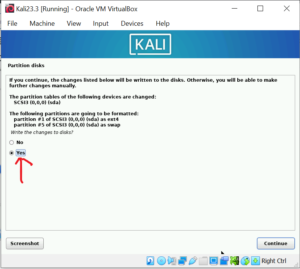
Next, it will ask you again if you are sure to write the changes to the disk. Select ‘Yes’ and hit Continue button as shown below.
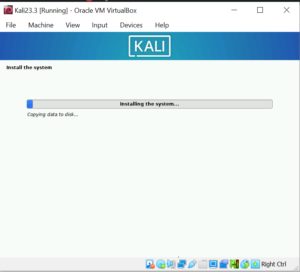
Installation will start and will take a while to complete as shown below.
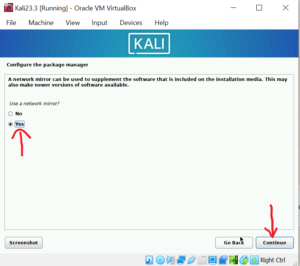
Next, during the installation, it will further ask few more question. Select Yes to use the network mirror as shown below. Next, Skip the http proxy configuration and continue.
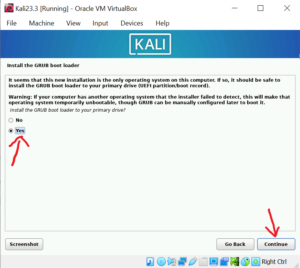
Next, it will ask you if want to install GRUB boot loader to your primary drive, Select Yes and hit the Continue button as shown below.
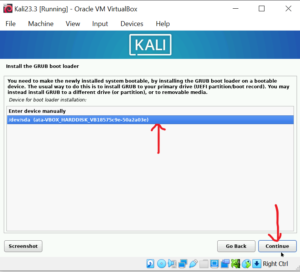
Next, it will ask you to select the device for boot loader. Select /dev/sda and hit the Continue button as shown below.
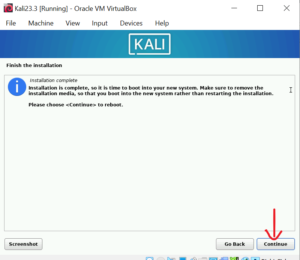
Step-6: Reboot the Virtual Machine
In this step, once the installation completes, it will ask you to reboot the machine . Click on Continue as shown below.
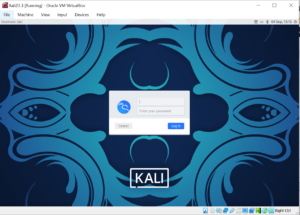
As soon as the reboot completes. Kali Linux will start and a pop up will appear to log into the system as shown below.
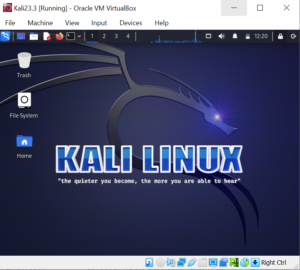
Step-7: Login to Kali Linux System
In this step, provide the credential of user you had created earlier to login to the machine. Once you login, you will get inside the machine as shown below. You are now good to go ahead and use the machine.
Summary
We have successfully installed the Kali Linux 2023.3 version in the VirtualBox. As we know, it comes up with many pre installed security tools which you can explore and try to get your hands dirty.
These are in fact great ideas in on the topic of blogging.
You have touched some pleasant things here. Any way keep up wrinting.
Wow, this article is good, my sister is analyzing these things, therefore I am going to tell her.