![[Solved] The authenticity of host 'github.com (20.207.73.82)' can't be established](https://www.linuxnasa.com/wp-content/uploads/2024/03/github-ssh-key-1-300x169.jpg)
In this tutorial, we will learn about how to fix the error ” The authenticity of host ‘github.com (20.207.73.82)’ can’t be established”. In order to fix this error, it is important to understand the root cause of the error. If you are working with GitHub for the first time, this error might looks catchy. But under the hood, the reason is pretty simple. When the git in your local system fails to authenticate with GitHub, this error is encountered. We will learn more about the error detail in this tutorial. After understanding the root cause, we will also look at the solution to fix the error. So, let us get started.
Why the Error Occurred?
This is a generic error which you will encounter while establishing a connection to github.com from local system. As we know, to connect to github.com, we first need to install git in our local system through which we then connect to GitHub. When git in your local system is unable to authenticate with GitHub using the current user’s SSH key, this error will occur in response. If you closely look at the error, git is first seeking for your confirmation to connect to GitHub. Once, you type ‘yes’, it then attempt to authenticate with GitHub using current user’s SSH key (public key). However, the authentication fails because SSH key does not have the necessary permissions to access the remote repository.
How to Reproduce the Error
I hope you have gained the understanding on the root cause of the error. In the next step, we will reproduce the error. This will give you the confidence that the error you are facing the is similar to what we have covered in this tutorial. To reproduce the error, I have executed the CLI command git submodule add [email protected]:linuxnasa/go-makefiles.git _mk. This command basically adds a submodule to the main project. When I executed the command, I saw below error in response.
[email protected] % git submodule add [email protected]:coder/go-makefiles.git _mk
Cloning into '/Users/coder/projects/coder-milestones/_mk'...
The authenticity of host 'github.com (20.207.73.82)' can't be established.
ED25519 key fingerprint is SHA256:+DiY3wvvV6TuJJhbpZisF/zLDA0zPMSvHdkr4UvCOqU.
This key is not known by any other names.
Are you sure you want to continue connecting (yes/no/[fingerprint])? yes
Warning: Permanently added 'github.com' (ED25519) to the list of known hosts.
[email protected]: Permission denied (publickey).
fatal: Could not read from remote repository.

Please make sure you have the correct access rights
and the repository exists.
In the above command,
git submodule add: command to add the submodule
[email protected]:linuxnasa/go-makefiles.git: remote url
_mk: destination folder
[Solved] The authenticity of host ‘github.com (20.207.73.82)’ can’t be established
Also Read: How to Install Kubernetes with Kind Tool on MacOS [Step by Step Guide]
Let us now talk about the solution which will help to fix the error. We will generate a new SSH Key pair for the current user. After that, we will add the current user’s public key to the GitHub account. Let us look at each step one by one as given below.
Prerequisite
- GitHub Account Created.
- ssh-agent Enabled.
- Basic understanding of Git CLI Commands.
Let us verify if the ssh-agent is running in the system using below command. If the command output does not return any error, it means the ssh-agent is enabled and in running state.
[email protected] ~ % ssh-add -l
NOTE:
Step-1: Generate SSH Key Pair
In the first step, we will generate a new SSH key pair for the current user if it is not already created. To confirm if the key SSH key pair is created or not, switch to home directory using the command cd $HOME. After that, get inside the .ssh folder and list the files as shown below. If you see only known_hosts file, it means SSH key pairs are not created.
[email protected] ~ % cd $HOME
[email protected] ~ % cd .ssh
[email protected] .ssh % ls -lhtr
-rw-r--r--@ 1 coder staff 92B Mar 27 17:43 known_hosts
Next, we will generate a new SSH key pair using below command. I have not set the passphrase while generating the key pair. Keep on entering for each prompt during the command execution.
[email protected] .ssh ~ % ssh-keygen -t rsa -b 4096 -C "[email protected]"
Generating public/private rsa key pair.
Enter file in which to save the key (/Users/coder/.ssh/id_rsa):
Enter passphrase (empty for no passphrase):
Enter same passphrase again:
Your identification has been saved in /Users/coder/.ssh/id_rsa
Your public key has been saved in /Users/coder/.ssh/id_rsa.pub
The key fingerprint is:
SHA256:kIQGasBTSDlxv81sU6g*AjjQQOKv4I3187Nf8C/NBiM [email protected]
The key's randomart image is:
+---[RSA 4096]----+
|=.. .. .. |
|.B . oo |
|+ o .o |
|+. o o . |
|=.o +.. S |
|+o.=E.oo . |
|o=o O +o.o. |
|++.o *. ooo |
|oo. o+.o. |
+----[SHA256]-----+
In above command,
ssh-keygen: command to generate SSH keys
-t rsa: type of key to generate. In this case, RSA
-b 4096: number of bits in the key
-C "[email protected]": adds a comment to the key.
Next, list the files again in .ssh folder. You will find two new files added in the folder. These are SSH public key and private key for the current user (coder).
[email protected] .ssh % ls -lhtr
total 24
-rw-r--r--@ 1 coder staff 92B Mar 27 17:43 known_hosts
-rw-------@ 1 coder staff 3.3K Mar 27 19:28 id_rsa
-rw-r--r--@ 1 coder staff 743B Mar 27 19:28 id_rsa.pub
Next, to see and validate the content of public key, you can use the command cat to see the content of public key file on the console as shown below.
[email protected] .ssh % cat id_rsa.pub
ssh-rsa AAAAB3NzaC1yc2EAAAADAQABAAABAQDUtFJoMgUVfjXK1QEwSdveFF7LW1BW6j8R7gD1xZaXqNQmb/u72CJGO6BafJWSZzIHmXG36BH+EgGKe4hrF2665Ysl8upZ9HoGNWdeT/48GrPGDav4h3SmVOUpA/8FIWAS724V3rQvKLSI9xaMnLb1uLGT6q0L4mHU5xGRCk79tycTnvKNwsYPbohNjGZ0500//AyQUIpvp4C+fAJTu2zVF6lSt8vssz/nVYoKQSMiGLUAwJmVWamq+/02Mu4tIkPlXr7B4Q3xSDwRxD+yt9lBTTDdZVhhl3s4mGnjYPq9XQoWRF41Nzbh1rJu7oVeaeL7y2OSuEHNRUVZQUjXCxZD== [email protected]
Step-2: Add SSH Key to SSH Agent:
In this step, we will add the newly generate SSH private key to the SSH agent which is running in our system using below command.
[email protected] .ssh % ssh-add ~/.ssh/id_rsa
Identity added: /Users/coder/.ssh/id_rsa ([email protected])
Step-3: Copy SSH Public Key:
In this step, we will copy the content of SSH public key to the macOS clipboard using a command-line utility known as pbcopy. In the below command, we take the content of .ssh/id_rsa.pub file and copy on the clipboard using pbcopy command as shown below. This content will be pasted in the GitHub in the next step.
[email protected] ~ % pbcopy < ~/.ssh/id_rsa.pub
Step-4: Add SSH Public Key to GitHub:
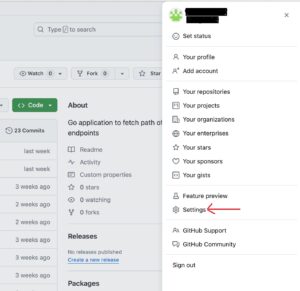
In this step, make sure you are connect to your GitHub account. If you are not connected, then login to GitHub account. After connecting to the account, click on the profile on the top right corner and select “Settings” option from the drop down as shown below.
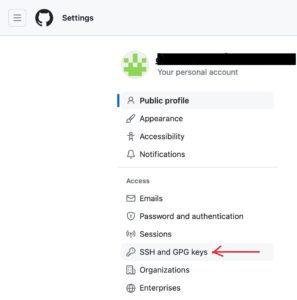
Next, click on ‘SSH and GPG keys’ option from the list as shown below.
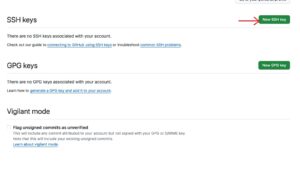
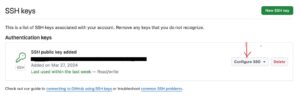
You will notice that currently there are no keys added to your GitHub account. To add a new SSH public key which we had copied earlier, click on ‘New SSH key’ button as shown below.
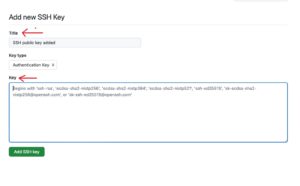
Next, add a description for SSH public key in ‘Title’ bot and paste the SSH public key in Key box. Next, click on “Add Key” button to add the SSH public key.
Step-5: Test SSH Connection:
Once the SSH public key is successfully added in the GitHub, we can verify the same using command ssh -T [email protected] as shown below.
[email protected] ~ % ssh -T [email protected]
Hi coder! You've successfully authenticated, but GitHub does not provide shell access.
In the command,
ssh: used to establish SSH connection to a remote host
-T: disables pseudo-tty allocation
[email protected]: SSH url for connecting to GitHub.
Step-6: Configure SSO
In this step, you can configure the SSO login for the organizations whom you want to give the authentication access. To do so, click on ‘Configure SSO‘ option and authorize the organizations from the list whom you want to give the access as shown below.
Step-7: Verify the Git Commands
In this step, I executed the same git command which had given me this error in the begining of this tutorial. This time the authentication will pass and submodule will successfully get added in the main project as shown below.
[email protected] .ssh % cd ..
[email protected] % git submodule add [email protected]:coder/go-makefiles.git _mk
Cloning into '/Users/coder/projects/coder-milestones/_mk'...
remote: Enumerating objects: 837, done.
remote: Counting objects: 100% (172/172), done.
remote: Compressing objects: 100% (75/75), done.
remote: Total 837 (delta 112), reused 147 (delta 97), pack-reused 665
Receiving objects: 100% (837/837), 190.14 KiB | 321.00 KiB/s, done.
Resolving deltas: 100% (477/477), done.
Summary
We have successfully fixed the error by applying the solution given in this tutorial. To learn more about GitHub and its usage, you can refer to its official documentation at docs.github.com.