Introduction
In this tutorial, we will look at how to install Apache web server on Linux operating system using 6 easy steps. Apache web server is like an entity that serves the requests it receives from any HTTPS client. In lay man term we can say, web server is like a waiter at a restaurant. It’s job is to listen to your requests, serve you the food you ordered and brings it to your table. You act as a HTTPS client in this case. We will look at the technical description of Apache web server in the next section and also learn how we to install Apache in Linux system.
![How to Install Apache Web Server on Linux: [6 Easy Steps]](https://www.linuxnasa.com/wp-content/uploads/2023/09/apache-install.jpg)
Apache Web Server Overview
Apache HTTP Server, commonly known as Apache, is a widely used open-source web server software. It plays a crucial role in serving web content, handling incoming web requests and delivering web pages to user’s browsers.
There are many usage of Apache web server. Some of them are listed below.
Hosting Websites: Apache is primarily used to host static and dynamic websites. It listens to incoming HTTP requests from client (web browsers or any HTTP client) and serves the requested web pages.
Load Balancing: Apache can distribute incoming web traffic across multiple web servers, ensuring better performance, scalability and high availability.
Security: It offers security features like SSL/TLS support for encrypted data transfer, authentication and access control using .htaccess files.
How to Install Apache Web Server on Linux: [6 Easy Steps]
Also read: How to Install Postman in VS Studio Code : [5 Easy Steps]
Prerequisite:
- CentOS 6/7 Operating System Installed
- Root privilege access
Step-1: Check Linux Operating System Distribution
In this step, check which Linux distribution is installed in your system using below command.
[root@linuxnasa ~]# cat /etc/os-release
NAME="CentOS Linux"
VERSION="7 (Core)"
ID="centos"
ID_LIKE="rhel fedora"
VERSION_ID="7"
PRETTY_NAME="CentOS Linux 7 (Core)"
ANSI_COLOR="0;31"
CPE_NAME="cpe:/o:centos:centos:7"
HOME_URL="https://www.centos.org/"
BUG_REPORT_URL="https://bugs.centos.org/"

CENTOS_MANTISBT_PROJECT="CentOS-7"
CENTOS_MANTISBT_PROJECT_VERSION="7"
REDHAT_SUPPORT_PRODUCT="centos"
REDHAT_SUPPORT_PRODUCT_VERSION="7"
Step-2: Install Apache HTTP Package
In this step, install the Apache HTTP package using yum package manager as shown below.
[root@linuxnasa ~]# yum install -y httpd
Loaded plugins: fastestmirror
Determining fastest mirrors
epel/x86_64/metalink | 27 kB 00:00:00
* base: centos.mirror.far.fi
* centos-qemu-ev: centos.mirror.far.fi
* epel: www.nic.funet.fi
* extras: centos.mirror.far.fi
* updates: centos.mirror.far.fi
base | 3.6 kB 00:00:00
centos-ceph-luminous | 3.0 kB 00:00:00
centos-openstack-rocky | 3.0 kB 00:00:00
centos-qemu-ev | 3.0 kB 00:00:00
docker-ce-stable | 3.5 kB 00:00:00
epel | 4.7 kB 00:00:00
extras | 2.9 kB 00:00:00
kubernetes/signature | 454 B 00:00:00
kubernetes/signature | 1.4 kB 00:00:00 !!!
updates | 2.9 kB 00:00:00
(1/4): epel/x86_64/updateinfo | 1.0 MB 00:00:00
(2/4): docker-ce-stable/7/x86_64/primary_db | 117 kB 00:00:00
(3/4): epel/x86_64/primary_db | 7.0 MB 00:00:00
(4/4): kubernetes/primary | 137 kB 00:00:00
kubernetes 1022/1022
Resolving Dependencies
There are unfinished transactions remaining. You might consider running yum-complete-transaction, or "yum-complete-transaction --cleanup-only" and "yum history redo last", first to finish them. If those don't work you'll have to try removing/installing packages by hand (maybe package-cleanup can help).
--> Running transaction check
---> Package httpd.x86_64 0:2.4.6-99.el7.centos.1 will be installed
..................................................................

..................................................................
---> Package apr.x86_64 0:1.4.8-7.el7 will be installed
---> Package apr-util.x86_64 0:1.5.2-6.el7_9.1 will be installed
---> Package httpd-tools.x86_64 0:2.4.6-99.el7.centos.1 will be installed
---> Package mailcap.noarch 0:2.1.41-2.el7 will be installed
--> Finished Dependency Resolution

Dependencies Resolved

======================================================================================================================================================
Package Arch Version Repository Size
======================================================================================================================================================
Installing:
httpd x86_64 2.4.6-99.el7.centos.1 updates 2.7 M
Installing for dependencies:
apr x86_64 1.4.8-7.el7 base 104 k
apr-util x86_64 1.5.2-6.el7_9.1 updates 92 k
httpd-tools x86_64 2.4.6-99.el7.centos.1 updates 94 k
mailcap noarch 2.1.41-2.el7 base 31 k

Transaction Summary
======================================================================================================================================================
Install 1 Package (+4 Dependent packages)

Total download size: 3.0 M
Installed size: 10 M
Downloading packages:
(1/5): apr-1.4.8-7.el7.x86_64.rpm | 104 kB 00:00:00
(2/5): apr-util-1.5.2-6.el7_9.1.x86_64.rpm | 92 kB 00:00:00
(3/5): httpd-tools-2.4.6-99.el7.centos.1.x86_64.rpm | 94 kB 00:00:00
(4/5): mailcap-2.1.41-2.el7.noarch.rpm | 31 kB 00:00:00
(5/5): httpd-2.4.6-99.el7.centos.1.x86_64.rpm | 2.7 MB 00:00:00
------------------------------------------------------------------------------------------------------------------------------------------------------
Total 12 MB/s | 3.0 MB 00:00:00
Running transaction check
** Found 24 pre-existing rpmdb problem(s), 'yum check' output follows:
bash-4.2.46-35.el7_9.x86_64 is a duplicate with bash-4.2.46-34.el7.x86_64

..........................................................

..........................................................

..........................................................
Installing : mailcap-2.1.41-2.el7.noarch 4/5
Installing : httpd-2.4.6-99.el7.centos.1.x86_64 5/5
Verifying : httpd-2.4.6-99.el7.centos.1.x86_64 1/5
Verifying : mailcap-2.1.41-2.el7.noarch 2/5
Verifying : apr-1.4.8-7.el7.x86_64 3/5
Verifying : httpd-tools-2.4.6-99.el7.centos.1.x86_64 4/5
Verifying : apr-util-1.5.2-6.el7_9.1.x86_64 5/5

Installed:
httpd.x86_64 0:2.4.6-99.el7.centos.1

Dependency Installed:
apr.x86_64 0:1.4.8-7.el7 apr-util.x86_64 0:1.5.2-6.el7_9.1 httpd-tools.x86_64 0:2.4.6-99.el7.centos.1 mailcap.noarch 0:2.1.41-2.el7

Complete!
Step-3: Verify HTTP Package In System
In this step, check if Apache HTTP package is installed in your system using rpm command as shown below.
[root@linuxnasa ~]# rpm -qa | grep httpd
httpd-2.4.6-99.el7.centos.1.x86_64
httpd-tools-2.4.6-99.el7.centos.1.x86_64
Ste-4: Allow Apache Ports on Linux
In this step, to make Apache web server work, you need to enable TCP ports 80 and 443 using either iptables or firewalld service, which ever is installed and supported in your system. Check which service is installed in your system as shown below.
[root@linuxnasa ~]# which firewalld
/sbin/firewalld

[root@linuxnasa ~]# which iptables
/sbin/iptables
As you see, I have installed both the services in my system. Next check which service is currently active using below command.
[root@linuxnasa ~]# systemctl status firewalld
● firewalld.service - firewalld - dynamic firewall daemon
Loaded: loaded (/usr/lib/systemd/system/firewalld.service; enabled; vendor preset: enabled)
Active: active (running) since Fri 2022-08-26 12:28:38 IST; 1 years 0 months ago
Docs: man:firewalld(1)
Main PID: 544 (firewalld)
Tasks: 2
Memory: 28.1M
CGroup: /system.slice/firewalld.service
└─544 /usr/bin/python2 -Es /usr/sbin/firewalld --nofork --nopid

[root@linuxnasa ~]# systemctl status iptables
Unit iptables.service could not be found.
As you see above, firewalld service is currently active in my system so we will configure firewalld rules to enable Apache ports. Use below command to enable the ports.
//To enable port 80
[root@linuxnasa ~]# firewall-cmd --permanent --add-port=80/tcp
success

//To enable port 443
[root@linuxnasa ~]# firewall-cmd --permanent --add-port=443/tcp
success

//To make the firewall rules persistent, reload the firewalld service
[root@linuxnasa ~]# firewall-cmd --reload
success
Step-5: Enable Apache Web Server
In this step, enable the Apache web service (httpd) using systemctl service as shown below.
[root@linuxnasa ~]# systemctl start httpd
Next, check the current status of httpd service. Make sure it is active as shown below.
[root@linuxnasa ~]# systemctl status httpd
● httpd.service - The Apache HTTP Server
Loaded: loaded (/usr/lib/systemd/system/httpd.service; disabled; vendor preset: disabled)
Active: active (running) since Thu 2023-09-14 23:40:08 IST; 8s ago
Docs: man:httpd(8)
man:apachectl(8)
Main PID: 1333434 (httpd)
Status: "Processing requests..."
Tasks: 6
Memory: 2.8M
CGroup: /system.slice/httpd.service
├─1333434 /usr/sbin/httpd -DFOREGROUND
├─1333435 /usr/sbin/httpd -DFOREGROUND
├─1333436 /usr/sbin/httpd -DFOREGROUND
├─1333437 /usr/sbin/httpd -DFOREGROUND
├─1333438 /usr/sbin/httpd -DFOREGROUND
└─1333439 /usr/sbin/httpd -DFOREGROUND

Sep 14 23:40:08 linuxnasa systemd[1]: Starting The Apache HTTP Server...
Sep 14 23:40:08 linuxnasa httpd[1333434]: AH00558: httpd: Could not reliably determine the server's fully qualified domain name, using f... message
Sep 14 23:40:08 linuxnasa systemd[1]: Started The Apache HTTP Server.
Hint: Some lines were ellipsized, use -l to show in full.
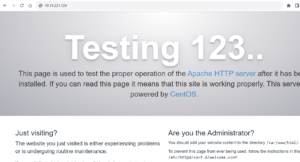
Step-6: Check Apache Server in Browser
In this step, to make sure Apache web server is working successfully, open your browser and type ‘localhost’ in the url or ‘eth0 ip’. I am using eth0 ip for demonstration . If Apache home page appears that means Apache web server is working as shown below.
BONUS
Server version: Apache/2.4.6 (CentOS)
Server built: May 30 2023 14:01:11
Summary
We have successfully installed the Apache web server in CentOS 6/7 Systems. You can install this package in any Linux distro or any other Operating System in the similar way. Different Linux distribution uses different package manager for installation but process less or more remains same.