Introduction
In this tutorial, we will learn about how to install Postman in VS Studio Code using 5 easy steps. If you are a API developer then this tool must be familiar to you as it is widely used by developers for testing APIs and other purpose. We will briefly look into what really Postman is and what features it offers along with its installation in VS Studio Code. So let’s get stared.
![How to Install Postman in VS Studio Code : [5 Easy Steps]](https://www.linuxnasa.com/wp-content/uploads/2023/09/postman.jpg)
Postman Overview
Also read: How to Install Flask in VS Code and Build REST API : [ 9 Easy Steps]
Postman is a popular and widely used API testing tool that simplifies the process of testing APIs, making requests to web services and and automating API-related tasks. It provides a user-friendly graphical interface that allows developers and testers to interact with APIs without writing code. Postman offers both, web-based platform and a desktop application.
Postman Features
Postman offers large set of features to its end user. Some of them are listed below.
API Request Building: Postman allows users to create and send HTTP requests (GET, POST, OUT, DELETE etc) to APIs by specifying the request method, headers, parameters and request body.
Automation and Testing: Postman supports the creation of automated test scripts using JavaScript. Test scripts can be added to requests to perform validations and assertions on API responses.
API Documentation: Postman allows users to create and publish API documentation with descriptions, examples and usage instructions, making it easy for developers to understand and use APIs.
Monitoring and Reporting: Postman provides monitoring and reporting capabilities to track the performance and health of APIs over time.
How to Install Postman in VS Studio Code : [5 Easy Steps]
Also read: What is API and its Usage ? :[4 Types of APIs]
Prerequisite
- Windows Operating System installed
- VS Code installed
Step-1: Install Postman Plugin
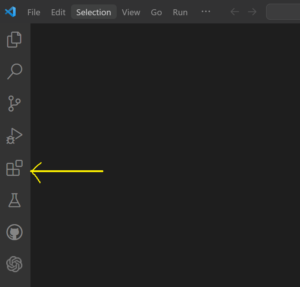
In this step, open VS Studio Code and navigate to Extensions button in the left side as shown below. Click on the ‘Extensions’ button.
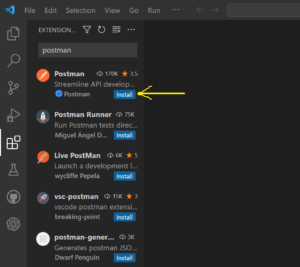
Next, search Postman in the search box and Click on the Install button of the first plugin displayed as shown below.
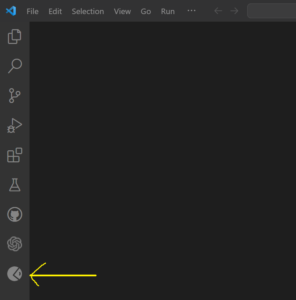
Next, once the plugin is installed, you will see a new button on the left side box as shown below. This is the Postman button added.
Step-2: Connect VS Code to Postman
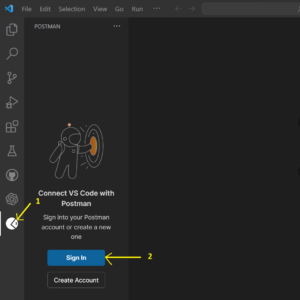
In this step, click on the Postman button from the left panel and then click on Sign in option to create a new account to Postman as shown below. This is the required configuration in order to use the Postman features.
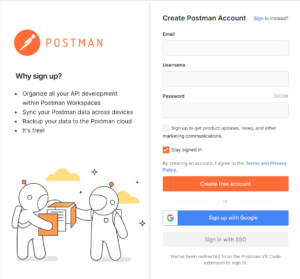
Step-3: Sign in to Postman
In this step, create a new account by providing your email id, username and password as shown below.
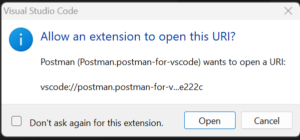
Step-4: Allow Postman Extension to Open URL
In this step, once you sign in to Postman, it will ask you to allow the extension to open the URI. Click on Open as shown below.
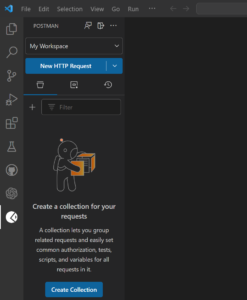
Next, you will see a new page in VS Studio Code as shown below. You are now good to go ahead and use the Postman from VS Studio Code.
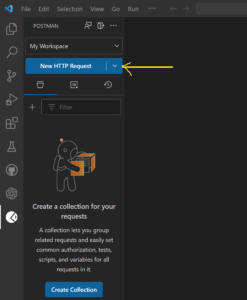
Step-5: Test Postman in VS Code
In this step, we will hit one of the google’s API endpoint to verify if Postman is working as expected. Click on the ‘New HTTP Request’ button as shown below.
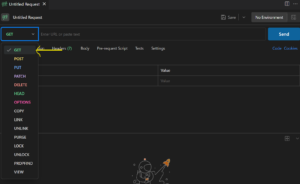
Next, select one of the HTTP method from the drop down list, I have selected GET method for demonstration as shown below.
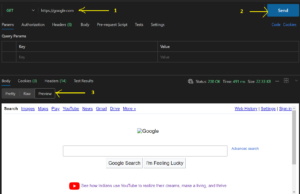
Next, in the search box type ‘https://google.com’ and click on Send button as shown below. In the response you will see a google page opened under the Preview tab. This is the response received from google’s API endpoint. Hence our Postman is now working in VS Studio Code.
Summary
We learnt about Postman and its installation in VS Studio Code. While Postman is a popular choice, there are alternative tools available for API testing and development. These are Insomia, Paw, Swagger (OpenAPI tool), cURL, SoapUI, Karate, HTTPie etc.