![How to Install Keycloak-23.0.0 on Windows [Follow 9 Easy Steps]](https://www.linuxnasa.com/wp-content/uploads/2023/11/install-keycloak-windows.jpg)
In this tutorial, we will learn about how to install Keycloak-23.0.0 on Windows system using 9 easy steps. Keycloak is an open source software which is designed to streamline and secure web applications. It allows SSO (Single Sign On) with IAM (Identity and Access Management). Keycloak is one of the famous OAuth server which is used to manage user identities and control access to resources. Keycloak provides the features like authentication and authorization, user management which makes it a best option when it comes to securing the application. We will start from the start. that is we will first look at how Keycloak is installed on Windows operation system. S, let us begin the tutorial.
How to Install Keycloak-23.0.0 on Windows [9 Easy Steps]
Also Read: How to Install PostgreSQL on Windows [Step by Step Guide]
To install the latest version of Keycloak on Window’s operating system, we have to follow certain steps which is covered in this section. At the time of writing this article, Keycloak-23.0.0 is the latest version. You can refer to official website keycloak.org to get the latest version details. Before you start the Keycloak installation, please make sure below prerequisites are met.
Prerequisite
- Windows Operating System Installed
- OpenJDK 17 Installed
- Basic understanding of Window’s Command Prompt
Step-1: Check OpenJDK Version
In this step, open the command prompt by pressing the key combination Win+r and type the command cmd. After typing the command, click on Ok button to open the command prompt as shown below.

Next, type the command java --version. If you get the similar output as shown below, it means OpenJDK is installed.
C:\Users\linuxnasa>java --version
openjdk 17 2021-09-14
OpenJDK Runtime Environment (build 17+35-2724)
OpenJDK 64-Bit Server VM (build 17+35-2724, mixed mode, sharing)
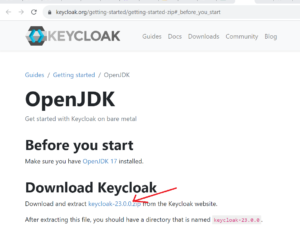
Step-2: Download Keycloak Arhive
In this step, download the keycloak-23.0.0.zip archive from the official Keycloak website. You can also click on the download link given in their official website if the version is different from what we have used in this tutorial.
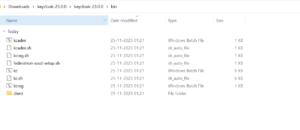
Step-3: Extract from Archive
In this step, navigate to the folder in your system where Keycloak archive is installed. Click on the archive and extract all the files from the zip file. Once done, you will see a new folder as shown below.

Step-4: Open CMD
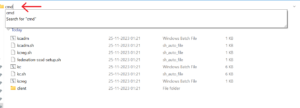
In this step, navigate to the bin folder by following the path as shown below. The Keycloak bin folder contains all the executable which we use to start the Keycloak server on different operating system. In Windows, we use kc.bat exe file to start the Keycloak server. This is shown in the upcoming step.
Next, open the command prompt on this Path. To do so, type cmd on the top search bar and press Enter key as shown below.
Step-5: Start Keycloak Server
In this step, we will start the Keycloak server in development mode. To do so, type the command kc.bat start-dev as shown below. If you see the similar output as below, it means the Keycloak server is started and running in your local system. By default the Keycloak server runs on localhost on port number 8080 as shown below.
C:\Users\linuxnasa\Downloads\keycloak-23.0.0\keycloak-23.0.0\bin>kc.bat start-dev
2023-11-25 01:58:37,728 INFO [org.keycloak.quarkus.runtime.hostname.DefaultHostnameProvider] (main) Hostname settings: Base URL: <unset>, Hostname: <request>, Strict HTTPS: false, Path: <request>, Strict BackChannel: false, Admin URL: <unset>, Admin: <request>, Port: -1, Proxied: false
2023-11-25 01:58:39,326 WARN [io.quarkus.agroal.runtime.DataSources] (main) Datasource <default> enables XA but transaction recovery is not enabled. Please enable transaction recovery by setting quarkus.transaction-manager.enable-recovery=true, otherwise data may be lost if the application is terminated abruptly
2023-11-25 01:58:39,774 WARN [org.infinispan.PERSISTENCE] (keycloak-cache-init) ISPN000554: jboss-marshalling is deprecated and planned for removal
2023-11-25 01:58:39,821 WARN [org.infinispan.CONFIG] (keycloak-cache-init) ISPN000569: Unable to persist Infinispan internal caches as no global state enabled
2023-11-25 01:58:39,853 INFO [org.infinispan.CONTAINER] (keycloak-cache-init) ISPN000556: Starting user marshaller 'org.infinispan.jboss.marshalling.core.JBossUserMarshaller'
2023-11-25 01:58:44,281 INFO [org.keycloak.connections.infinispan.DefaultInfinispanConnectionProviderFactory] (main) Node name: node_311265, Site name: null
2023-11-25 01:58:44,293 INFO [org.keycloak.broker.provider.AbstractIdentityProviderMapper] (main) Registering class org.keycloak.broker.provider.mappersync.ConfigSyncEventListener
2023-11-25 01:58:46,322 INFO [io.quarkus] (main) Keycloak 23.0.0 on JVM (powered by Quarkus 3.2.9.Final) started in 9.603s. Listening on: http://0.0.0.0:8080
2023-11-25 01:58:46,322 INFO [io.quarkus] (main) Profile dev activated.
2023-11-25 01:58:46,322 INFO [io.quarkus] (main) Installed features: [agroal, cdi, hibernate-orm, jdbc-h2, jdbc-mariadb, jdbc-mssql, jdbc-mysql, jdbc-oracle, jdbc-postgresql, keycloak, logging-gelf, micrometer, narayana-jta, reactive-routes, resteasy-reactive, resteasy-reactive-jackson, smallrye-context-propagation, smallrye-health, vertx]
2023-11-25 01:58:46,330 WARN [org.keycloak.quarkus.runtime.KeycloakMain] (main) Running the server in development mode. DO NOT use this configuration in production.
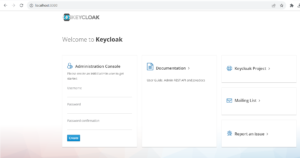
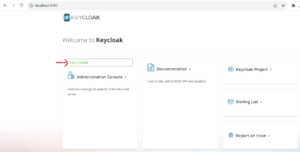
Step-6: Open Keycloak Gui on Browser
In this step, after making sure that the Keycloak server is up, we will open the Keycloak GUI on any browser in our local system. To do so, open any browser and type ‘http://localhost:8080/’ in the url. It will open the Keycloak gui as shown below.
Step-7: Set Keycloak Admin Console Credential
In this step, we will set the Admin credential via gui. This is one time activity whenever Keyclaok is installed first time in the system. To do so, click on the Admin Console button and provide a user and password. Next, click on create credential button as shown below.
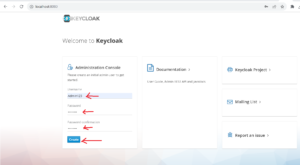
If the credential is set successfully, you will see below confirmation pop up on the screen.
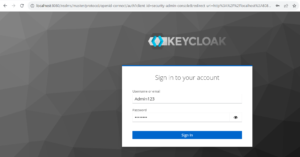
Step-8: Login to Admin Console
In this step, we will login to the admin console using the credential which we configured s in the previous step as shown below
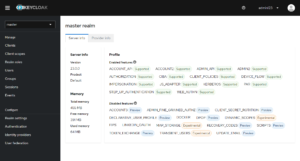
If the admin login is successful, it will redirect to the admin home page as shown below . You can now use the Keycloak to create new realms, register clients, create users and any other operation using the gui.
Step-9: Stop the Keycloak Server
In this step, after you have validated and completed all the task, you can stop the Keycloak server from command prompt where we had started the server by pressing the key Ctrl+C. If the server is stopped successfully, it will show below message and take you back to the command prompt.
.................................................................................................................

...................................................................................................................
2023-11-25 01:58:46,330 WARN [org.keycloak.quarkus.runtime.KeycloakMain] (main) Running the server in development mode. DO NOT use this configuration in production.
2023-11-25 02:07:29,224 INFO [org.keycloak.services] (executor-thread-6) KC-SERVICES0009: Added user 'Admin123' to realm 'master'
2023-11-25 02:07:29,231 INFO [org.keycloak.services] (executor-thread-6) KC-SERVICES0077: Created initial admin user with username Admin123
2023-11-25 02:14:58,594 INFO [io.quarkus] (Shutdown thread) Keycloak stopped in 0.127s
Terminate batch job (Y/N)? y

C:\Users\linuxnasa\Downloads\keycloak-23.0.0\keycloak-23.0.0\bin>
Summary
We have successfully installed the Keycloak latest version in the Windows operating system. We can now explore the features of Keycloak like creating new realms, registering web applications, creating users and groups and so on.