![How to Setup and Use MongoDB Atlas Database on Windows [Step by Step Guide]](https://www.linuxnasa.com/wp-content/uploads/2024/02/mongodb-atlas-300x169.jpg)
What is MongoDB Atlas Database?
In this tutorial, we will learn about “how to setup and use MongoDB atlas database on Windows using step by step guide”. MongoDB Atlas is a fully managed database service provided by MongoDB inclusive. It is a cloud-based database service that allows users to deploy, manage and scale MongoDB databases without the need to handle the underlying infrastructure. MongoDB is a NoSQL document database that provides flexibility and scalability for handling large volumes of unstructured or semi-structured data.
MongoDB Atlas supports various deployment options, including replica sets and sharded clusters, providing users with the flexibility to design their database architecture based on their application requirements.
It’s important to note that MongoDB Atlas is a cloud-based service, so users interact with it through a web-based user interface or programmatically using APIs. The service abstracts much of the operational complexity associated with managing MongoDB databases, making it an attractive choice for developers and organizations looking for a scalable and hassle-free MongoDB solution.
How to Setup and Use MongoDB Atlas Database on Windows [Step by Step Guide]
So far we have understood what MongoDB atlas database is and why is it used. Let us now setup the database from the scratch and understand the basic working of it. As I already mentioned above, since it is cloud based database, so you do not have to install it on your local machine instead you just have to create a account and do all the configuration right there. Before you start following the steps below, make sure prerequisites are met.
Also Read: How to Create Database in MariaDB [Step by Step Guide]
Prerequisite
- Windows Operating System Installed
- VS Code Installed
- Access to the internet
Create new Account
Step-1: Open MongoDB website
The very first step is to create a new account on Mongodb.com. Open the website and click on the 3 dots. Next, select “Sign in” option to create a new account as shown below. Provide all the required details and create the account.

Step-2: Create new User Account
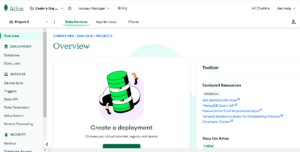
Next, once you have successfully created the new user account, login to your account . If you are redirected to the home page like shown below, it means your account is now ready to start setting up the database configuration which we will do in the next section.
Create New Database Cluster
Step-1: Build new Database Cluster
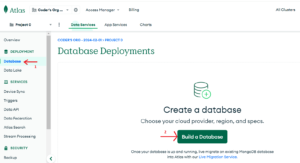
So next step is to create a new database, To do so, click on “Databases” option from the left panel. Next, click on “Build a Database” option to create a new database as shown below.
Step-2: Create Database Cluster
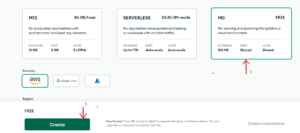
Next, select the “FREE” tier template from all 3 available templates as this will not cost you any charges. The free tier comes up with limit resources which is enough for small projects. You can keep rest of the configuration as default. Next, click on “Create” button to create the database cluster as shown below.
Create New User
Step-1: Create New User Credentials
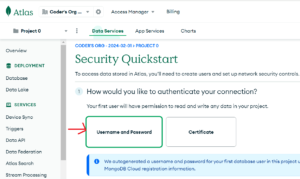
In this step, once database cluster is created, you will be redirected to a page where you have to configure a new user which we will use to connect to connect to the database cluster. To do so, follow below steps in order. First, you can either create new user or use certificate to authenticate and connect to the database cluster. I have selected the default option which is to create a new user as shown below.
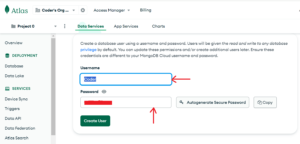
Next, provide any username and password for that user as shown below. Next, click on “Create” button to create the new user.
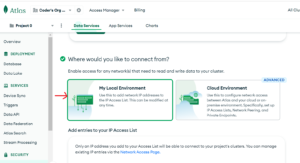
Next, leave the network selection as default which is “My Local Environment” as shown below.
Step-2: Generate IP Address
Next step is to generate the IP address. Atlas only allows client connections to a cluster from entries in the project’s IP Access List. Each entry should either be a single IP address or a CIDR-notated range of addresses. Click on “Add my IP address” to add the IP address as shown below. After that click on “Finish and Close “ button to complete the configuration.
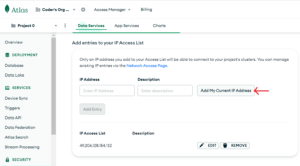
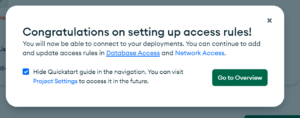
If the configuration is done successfully, you will see a pop-up like below which confirms the success message as shown below.
Generate connection URI
Step-1: Click on Connect Button
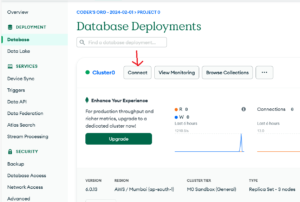
In this step, we will generate connection URI which will be used to connect to the database cluster. Click on the “Database” option from the left panel again. Next, click on “connect” option next to your cluster as shown below.
Step-2: Select Driver
Next, click on “Drivers” option to select the driver as shown below. 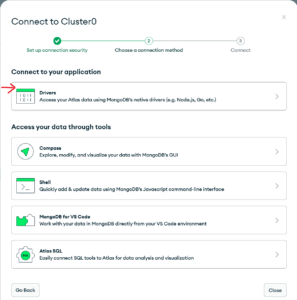
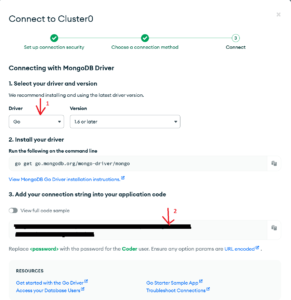
Next, select the driver. For the demonstration purpose, we will use Go program to connect to the database cluster. After, selecting the driver, you will get a “uri” string. Save this string somewhere in your local machine so that you can use it later while writing the Go program. I have masked my “uri” for security reasons.
Generate Sample dataset
Step-1: Load Sample Dataset
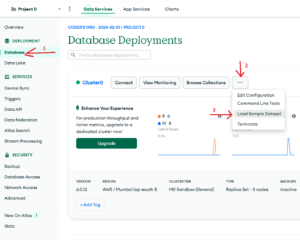
In this step, we will create some sample dataset. This is required to test the various use cases such as fetching the data , updating the data, deleting the data and so on. To do this, start by clicking on 3 dots, then select “Load Sample Dataset” option as shown below.
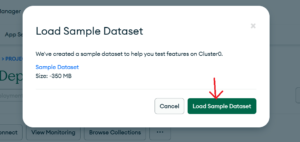
Next, a pop up will appear. Click on “Load Sample Dataset” option as shown below. It will take few minutes to upload the dataset in the database depending on the size of the dataset. Atlas provide sample data set to the users for learning purpose. You can also create your own dataset but for the demonstration purpose we will go ahead with the default dataset.
Step-2: Verify Sample Dataset
Next, once the dataset upload s complete, click on the “Browse Collections” option to verify if dataset is visible as shown below.
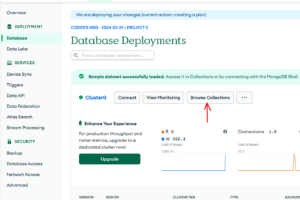
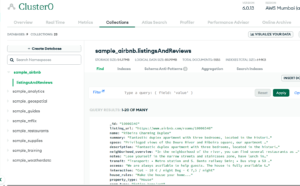
If you see below databases created, it means dataset is successfully loaded and ready to use.
Create go code to connect to MongoDB
In this step, we will write a simple Go code which will connect to the MongoDB database cluster using the uri and user credential which we had created in previous steps. We will also write a logic to fetch the data from one of the database.
Create a mod file using below command as shown below.
> go mod init gomongodb
go: creating new go.mod: module gomongodb
Next, Install mongo go package which provides a MongoDB driver API for Go which can be used to interact with MongoDB API. To do so, use below command.
> go get go.mongodb.org/mongo-driver/mongo
Next, create a new main.go file and add below code to it.
package main

import (

    "context"
    "fmt"
    "log"
    "time"
    "go.mongodb.org/mongo-driver/mongo"
    "go.mongodb.org/mongo-driver/mongo/options"
)

// Listing represents the structure of the data stored in MongoDB
type Listing struct {

    ID      string `bson:"_id"`
    Name    string `bson:"name"`
    Summary string `bson:"summary"`
}

func main() {

    // Set your MongoDB Atlas connection string
    connectionString := "mongodb+srv://Coder:[email protected]/?retryWrites=true&w=majority"

    // Create a context
    ctx, cancel := context.WithTimeout(context.Background(), 10*time.Second)
    defer cancel()

    // Connect to MongoDB
    client, err := mongo.Connect(ctx, options.Client().ApplyURI(connectionString))

    if err != nil {
        log.Fatal(err)
    } else {
        fmt.Println("\nDatabase Connection Successful")
    }

    defer func() {

        if err := client.Disconnect(ctx); err != nil {
            log.Fatal(err)
        }
    }()

    // Access the database and collection
    database := client.Database("sample_airbnb")
    collection := database.Collection("listingsAndReviews")

    // Query to find a document
    filter := map[string]interface{}{"_id": "10096773"}
    var result Listing

    // Execute the query
    err = collection.FindOne(ctx, filter).Decode(&result)

    if err != nil {
        log.Fatal(err)
    }

    // Print the result
    fmt.Println("Fetching data from Database:")
    fmt.Printf("Listing ID: %s\n", result.ID)
    fmt.Printf("Listing Name: %s\n", result.Name)
    fmt.Printf("Summary: %s\n", result.Summary)

}
- Import necessary packages for handling MongoDB operations. The
mongo-driverpackage provides tools for interacting with MongoDB databases. - Define a Go struct (
Listing) that mirrors the structure of the MongoDB document. The struct tags (bson:"_id",bson:"name",bson:"summary") specify the corresponding MongoDB field names. - The main function is the entry point of the program.
- Variable
connectionStringstores the actual MongoDB Atlas connection string(uri). It includes the username, password, cluster address, and other parameters. - A context
ctxis created with a timeout of 10 seconds. Thedeferstatement ensures that thecancelfunction is called to release resources when the function exits. - Variable
clientstores the status of connection to MongoDB using the provided connection string. If an error occurs, it logs the error and exits. If successful, it prints a message indicating a successful connection. - defer() function is used to defer the disconnection of the MongoDB client, ensuring that it is disconnected when the main function exits.
- Variables database stores the specified database (
sample_airbnb) and variable collection stores the specified collection (listingsAndReviews) within MongoDB. - Variable filter stores the query to find a document with a specific
_idvalue. It then usesFindOneto execute the query andDecodeto populate theresultstruct with the retrieved document. - Last 4 lines prints the retrieved data to the console.
> go run .\main.go

Database Connection Successful
Fetching data from Database:
Listing ID: 10096773
Listing Name: Easy 1 Bedroom in Chelsea
Summary: A comfortable one bedroom for responsible guests. Plenty of natural light. Walk up building. You'll feel like a local staying in this residential neighborhood, right next to great food, bars, subways, the High Line, Chelsea Piers, etc.
Summary
We have successfully created a MongoDB cluster and database. We also learnt about creating a Go code to test the connectivity to the MongoDB atlas database and fetch the data from the database. You can try to play around with this setup to get more hands on on the topics.