In this tutorial, we will learn about “how to install MongoDB on Windows operating system“. Databases are everywhere. If you are reading this tutorial right now, it means the content is served to you after fetching from a database which is running in the backend. Data are broadly divided into two types. These are structure data and unstructured data. Structured data uses SQL databases like PostSQL, MySQL etc. whereas unstructured data used NoSQL databases like MongoDB, ArangoDB and so on. We will learn more about MongoDB database followed by the installation on Windows 64 bit operating system. SO, let us begin the tutorial.
![MongoDB Tutorial 1 [How to Install MongoDB on Windows]](https://www.linuxnasa.com/wp-content/uploads/2024/02/install-mongodb-windows-300x169.jpg)
What is MongoDB?
MongoDB is a popular open-source, NoSQL database management system that provides high performance, high availability and easy scalability. It is designed to handle unstructured or semi-structured data which makes it particularly suitable for applications with evolving and dynamic data models. Below are some of the key features of MongoDB.
- MongoDB stores data in JSON-like format known as BSON (binary JSON).
- MongoDB is schema-less which means documents in a collection can have different fields.
- MongoDB is designed for high performance, supporting features like indexing, sharding and replication.
There are many other features of MongoDB which makes is one of the most usable database among the developers for their applications. To learn more, visit theMongoDB offcial document on their website.
Why MongoDB is Used?
MongoDB Tutorial 1 [How to Install MongoDB on Windows]
Also Read: How to Setup and Use MongoDB Atlas Database on Windows [Step by Step Guide]
So far we learnt about MongoDB database and its usage in deferent field of application development. Les us now move on to the installation procedure of MongoDB on Windows operating system. Before you start following the steps to install the MongoDB, I recommend you to check if prerequisites are met.
Prerequisite
- Windows 64 bit operating system installed.
- Admin access in the system
- Basic understanding of Windows operating system
Step-1: Select MongoDB binary for Windows
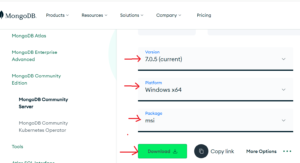
In this step, open the MongoDB official website mongodb.com where different format of MongoDB binaries are available for download and install. After url is opened, scroll down a bit and click on the option “select package option” to select the MongoDB binary compatible with Windows operating system as shown below.

Step-2: Download the MongoDB Installer
In this step, select the MongoDB version based on your requirement from the drop down. I have selected the latest version (7.0.5). Next, select the Platform as Windows. In the Package option, select msi from the drop down . Once done, click on Download button to download the MongoDB installer (.msi) as shown below.
Step-3: Install MongoDB using Binary
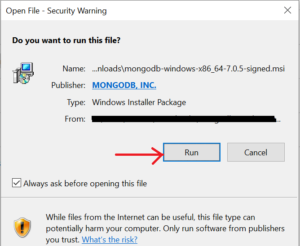
In this step, after the .msi installer is downloaded, open the file location in your local machine and double click on the download MongoDB installer to begin the installation as shown below.

Next, after you click on the .msi file, a pop up will appear for the installation. Click on the Run button to begin the installation as shown below.
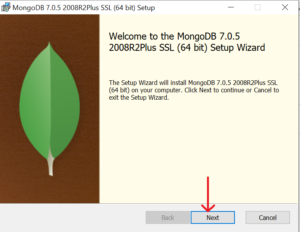
Next, click on the Next button as shown below.
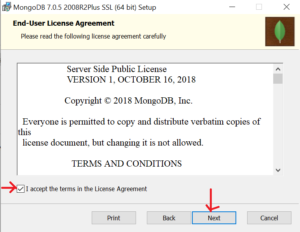
Next, tick mark the check box to accept the license and then click on Next button as shown below.
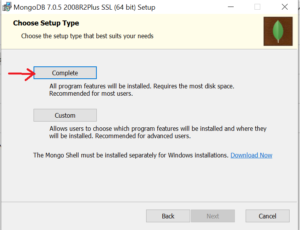
Next, Click on the Complete button to install all the default feature of MongoDB as shown below.
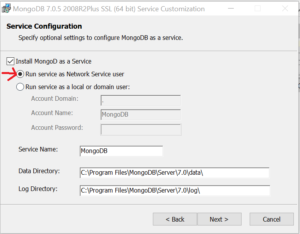
Next, tick mark the check box “Install MongoDB as a service” and select the option “Run service as Network Service user”. Click on the Next button as shown below.
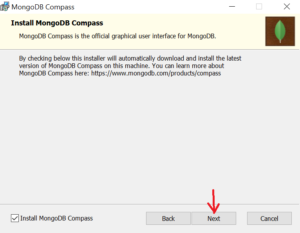
Next, tick mark the check box “Install MongoDB Compass” and click on the Next button as shown below. MongoDB compass is another supporting tool which is mostly used for visualizing the data stored in MongoDB database. We will explore this tool more in the next tutorial.
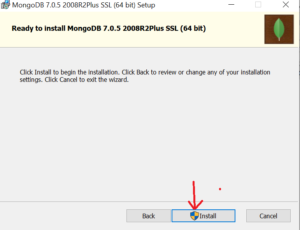
After all the configurations are selected, click on the Install button to begin installing the MongoDB as shown below.
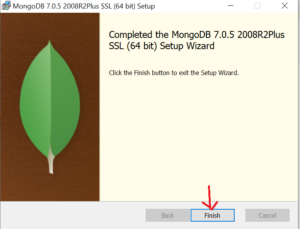
After the installation is completed, click on the Finish button as shown below.
Step-4: Restart Machine
In this step, we will restart the machine. This will restart the MongoDB daemon in the machine after which it will be ready to use. To do so, simple restart your Windows machine.
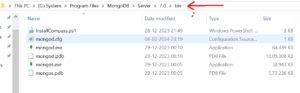
Step-5: Verify the MongoDB Installation
In this step, once the installation is completed successfully, we will verify the same. To do so, open the directory path in your machine where MongoDB binaries are stored as shown below.
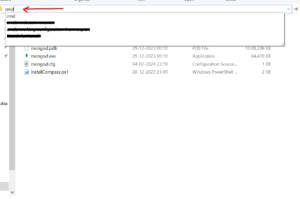
Next, type cmd in the location bar and press Enter key to open the Windows command prompt from this path as shown below.
Execute below command to find the MongoDb version. If it returns the version detail in the command output. It means MongoDB is successfully installed in the system.
C:\Program Files\MongoDB\Server\7.0\bin>mongod.exe --version
db version v7.0.5
Build Info: {
"version": "7.0.5",
"gitVersion": "7809d71e84e314b497f282ea8aa06d7ded3eb205",
"modules": [],
"allocator": "tcmalloc",
"environment": {
"distmod": "windows",
"distarch": "x86_64",
"target_arch": "x86_64"
}
}
Step-6: Run MongoDB Server
In this step, after verifying the MongoDB installation, we have to run the MongoDB server (mongod daemon) in order to use the MongoDB. Let us first run the mongod executable using below command.
C:\Program Files\MongoDB\Server\7.0\bin> mongod
{"t":{"$date":"2024-02-05T10:29:56.852+05:30"},"s":"I", "c":"NETWORK", "id":4915701, "ctx":"thread1","msg":"Initialized wire specification","attr":{"spec":{"incomingExternalClient":{"minWireVersion":0,"maxWireVersion":21},"incomingInternalClient":{"minWireVersion":0,"maxWireVersion":21},"outgoing":{"minWireVersion":6,"maxWireVersion":21},"isInternalClient":true}}}
{"t":{"$date":"2024-02-05T10:29:56.853+05:30"},"s":"I", "c":"CONTROL", "id":23285, "ctx":"thread1","msg":"Automatically disabling TLS 1.0, to force-enable TLS 1.0 specify --sslDisabledProtocols 'none'"}
.............................................................................................................................................
.............................................................................................................................................
{"t":{"$date":"2024-02-05T10:29:56.858+05:30"},"s":"E", "c":"CONTROL", "id":20557, "ctx":"initandlisten","msg":"DBException in initAndListen, terminating",
"attr":{"error":"NonExistentPath: Data directory C:\\data\\db\\ not found. Create the missing directory or specify another path using (1) the --dbpath command line option,
or (2) by adding the 'storage.dbPath' option in the configuration file."}}
..............................................................................................................................................
...........................................................................................................................................
{"t":{"$date":"2024-02-05T10:29:56.865+05:30"},"s":"I", "c":"CONTROL", "id":23138, "ctx":"initandlisten","msg":"Shutting down","attr":{"exitCode":100}}
NOTE:
mongod is a daemon process that runs in the background. IT handles database processes like accessing, retrieval and updates.
As you see, right now the MongoDB server startup is failing because it is looking for the directory C:\\data\\db\\ where databases will be stored. So, let us create this path in local machine. I have created the Path “MongoDatabases/data/db” as shown below.

After creating the subdirectories, let us again execute the mongod binary to start the server. This time, we will also pass the path to <parent-directory>/data/db directory as shown below.
C:\Program Files\MongoDB\Server\7.0\bin>mongod --dbpath C:\Users\linuxnasa\Documents\MongoDatabases\data
{"t":{"$date":"2024-02-05T10:48:35.016+05:30"},"s":"I", "c":"CONTROL", "id":23285, "ctx":"thread1","msg":"Automatically disabling TLS 1.0, to force-enable TLS 1.0 specify --sslDisabledProtocols 'none'"}
...........................................................................................................................................
..........................................................................................................................................
{"t":{"$date":"2024-02-05T10:48:39.994+05:30"},"s":"I", "c":"CONTROL", "id":8423403,
"ctx":"initandlisten","msg":"mongod startup complete","attr":{"Summary of time elapsed":{"Startup from clean shutdown?":true,"Statistics"
:{"Transport layer setup":"0 ms","Run initial syncer crash recovery":"0 ms",
"Create storage engine lock file in the data directory":"0 ms","Get metadata describing storage engine":"0 ms",
"Create storage engine":"119 ms","Write current PID to file":"0 ms","Write a new metadata for storage engine":"26 ms","
Initialize FCV before rebuilding indexes":"15 ms","Drop abandoned idents and get back indexes that need to be rebuilt or builds that need to be restarted":"0 ms",
"Rebuild indexes for collections":"0 ms","Load cluster parameters from disk for a standalone":"5 ms","Build user and roles graph":"0 ms",
"Set up the background thread pool responsible for waiting for opTimes to be majority committed":"1 ms","Initialize information needed to make a mongod instance shard aware":
"0 ms","Start up the replication coordinator":"0 ms","Start transport layer":"15 ms","_initAndListen total elapsed time":"2080 ms"}}}}
You will notice that now the server is started successfully on local machine. To stop the server, press Ctrl+C key.
Summary
We have successfully installed MongoDB server in Windows machine. We also verified the MongoDB installation using Windows command prompt. In the next tutorial, we will learn about installation of some more tools which makes the working with MongoDB quite smooth and user friendly such as MongoDB compass, mongosh etc.