![[Solved] PosgreSQL Extension for VS Code- linuxnasa](https://www.linuxnasa.com/wp-content/uploads/2023/11/postgreql-vscode-extension.jpg)
In this tutorial, we will learn about how to configure PostgreSQL extension for VS Code. There are many ways to use PostgreSQL database. For example, you can directly interact with the database through Windows command prompt (cmd). You might often wonder that why will we ever need to interact with PostgreSQL database through VS Code or any other IDE when we can do the same job through Windows command prompt?.
Well, this really is done for many reasons. For example, let us assume we are developing a RestAPI using Flask or any other framework in VS Code. The API requires to store some data in the database. To do this, it has to be integrated with the database through building a connection to the database. In this case, we will integrate the PostgreSQL database in the VS Code which makes it easy for the API to build a connection with database and access the database using suitable Python packages. Let us see how we can install the plugin in the upcoming section of this tutorial.
[Solved] PostgreSQL Extension for VS Code
Installing the PostgreSQL plugin in VS Code is straight forward process which we will look at in the next section. Please make sure all the pre-requisite are met before you follow the steps to install and configure the PostgreSQL plugin in VS Code.
Prerequisite
- Windows Operating System Installed.
- VS Code IDE Installed.
- PostgreSQL Database is installed
NOTE:
Step-1: Open Extension Section
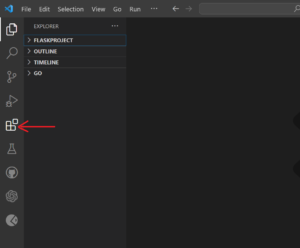
In this step, first click on Extensions option on VS Code present at the middle left corner as shown below.
Step-2: Install PostgreSQL Plugin
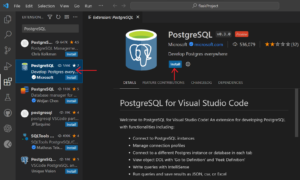
In this step, search for ‘PostgreSQL‘ in the search bar at the top left corner. Next, select the PostgreSQL plugin and then click on the Install button to install the plugin as shown below.
Step-3: Connect to PostgreSQL from VS Code
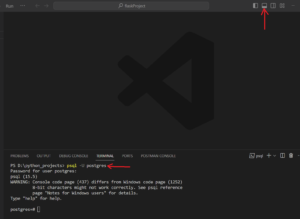
In this step, once the plugin is installed, open the VS Code terminal which is present at top right corner and execute psql -U postgres command to connect to PostgreSQL database. In the command postgres is the default user which we use to connect to the database.
Step-4: Verify the PostgreSQL Plugin Installation
In this step, after connecting to database, execute the command \l to view all the databases as shown below. If it returns the databases in the output, tit means the PostgreSQL plugin is installed successfully and database is integrated with VS Code.
postgres-# \l
List of databases
Name | Owner | Encoding | Collate | Ctype | ICU Locale | Locale Provider | Access privileges
-----------+----------+----------+--------------------+--------------------+------------+-----------------+-----------------------
postgres | postgres | UTF8 | English_India.1252 | English_India.1252 | | libc |
template0 | postgres | UTF8 | English_India.1252 | English_India.1252 | | libc | =c/postgres +
| | | | | | | postgres=CTc/postgres
template1 | postgres | UTF8 | English_India.1252 | English_India.1252 | | libc | =c/postgres +
| | | | | | | postgres=CTc/postgres
(3 rows)
-- More --
Summary
We have successfully installed the PostgreSQL plugin with just few simple steps. You are now all set to integrate your application with the database and build up a connection to access the database. If you are building any API (say RestAPI) which requires to store and fetch data from database through VS Code, this configuration will be required.