![WebchatGPT Extension for Chrome [Step by Step Guide to Install Plugin]](https://www.linuxnasa.com/wp-content/uploads/2023/10/WebchatGPT_chrome_extension.jpg)
In this tutorial, we will learn about how webchatgpt extension for chrome is installed using step by step guide. If you are using ChatGPT free version (which is GPT 3.5), you must have noticed that the response we get for any question are not accurate and current data. This is because ChatGPT training data set are not current. To overcome this challenge, Chrome browser provides an extension known as ‘WebchatGPT’ which allows ChatGPT to get the internet access and return the current and accurate data from the internet.
We will look at the installation procedure of this extension in the upcoming section of this article. So let us get started.
WebchatGPT Extension Obverview
WebchatGPT is a Chrome browser extension which when installed, enhances the functionality of ChatGPT. It allows users to have more accurate and up-to-date data. This extension also adds the relevant web results to your prompts when using ChatGPT. By integrating the real-time internet access, WebchatGPT ensures that the information provided is current and accurate. This enhances the chatbot’s capabilities.
WebchatGPT Extension for Chrome [Step by Step Guide to Install Plugin]
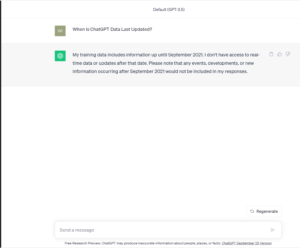
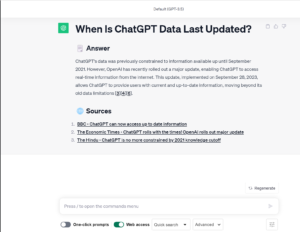
When you search any data, the response will be returned based on training data till September 2021 as shown below. This is because ChatGPT free version (GPT 3.5) is not fed with the current data. So to get the most latest data from internet, we have to install and integrate WebchatGPT extension is the chrome browser. I have asked ChatGPT that when is its training data last updated. It will response that its data was last updated in Septenber 2021. Let us now follow below steps to add the extension in the Chrome browser.
Prerequisite
- Access to internet
- Chrome browser installed
- Free account created in ChatGPT
Step-1: Open Extension in Chrome Browser
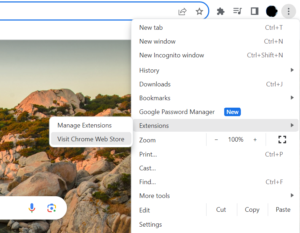
In this step, open your chrome browser and click on 3 dots at the top right corner. Next, click on Extensions -> Visit Chrome Web Store option as shown below.
Step-2: Search Webchatgpt Plugin
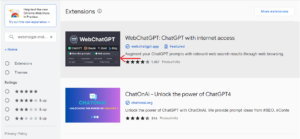
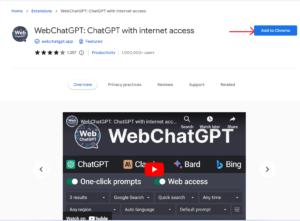
In this step, in the search box at the left panel, search for ‘webchatgpt chatgpt’ extension as shown below. Please note there are similar kind of many extensions available in the chrome store, you need to select the right one which is shown in the snip below.
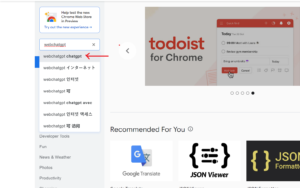
Next, click on the first extension as shown in the snip below.
Step-3: Install Webchatgpt Extension
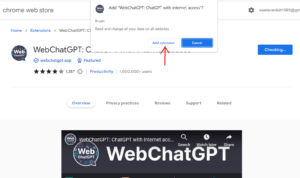
In this step, click on the ‘Add to Chrome‘ button to install the extension in your chrome browser. A pop up will appear after you click on the Install button.
Next, click on ‘Add extension’ to allow this extension to get integrated with the Chrome browser.
Step-4: Login to ChatGPT
In this step, login to chat.openai.com. You will notice that web access tab has been added and enabled in the chatgpt at the bottom as shown below. This ensures that now chatgpt has the access to the internet. If you do now want to use the current data from internet, simply turn off this option by clicking on the Web access button.

Step-5: Verify Webchatgpt Extension Working
In this step, to verify that the WebchatGPT extension is working correctly, search the same question as we used in the beginning of this tutorial and see the response from ChatGPT. You will see it returns the latest data by fetching from the internet as shown below.
Summary
We have successfully installed the WebchatGPT extension in the chrome. By using this extension, we get many perks such as list of sources available in the internet.