In this tutorial, we will learn about how to install Istio on Windows 10 using 4 easy steps. Istio is one of the popular service mesh option available for operators in the market. Istio comes up with CLI utility called istioctl that allows and makes it easy for the operators to debug their Istio service mesh deployment. Let’s first understand some of the basic concepts before jumping into installing the Istio on Windows 10 operating system.
![How to Install Istio on Windows 10 [4 Easy Steps]](https://www.linuxnasa.com/wp-content/uploads/2023/08/a-istio.jpg)
What is Service Mesh?
Let’s try to understand the Service Mesh by taking an example of restaurant. Imagine you are the owner of a giant restaurant. You have Chefs to cook food, waiters to take orders, servers to take online order and customers who waits to enjoy their meal. Let’s relate this to computer world applications.
In digital world, a giant application is made up of smaller parts called “microservices”. Just like in the restaurant, these microservices work together to provide a seamless experience to users. However, as the number of microservices grows, things can get more complicated. Hence, service mesh comes in the picture which helps microservices to communicate and collaborate effectively to deliver applications without hiccups. Istio is one of the service mesh . There are other open-source service mesh available like Linkerd, Consul Connect, Network service mesh etc.
Istio Overview
Istio is an open-source service mesh platform that provides a way to manage, secure and monitor microservice based applications. It helps to overcome the challenges that comes with deploying and maintaining a large number of microservices by offering a set of tools and capabilities to handle service-to-service communication, traffic management, security, observability and more.
Istio is made up of two components, a data plane and a control plane. All the traffic management is done by Istio’s data plane by using Envoy sidecar proxy that helps to route traffic and call between the services. Istio control plane is used to configure routing and view metrices by the developers. Some of the features that Istio provides are:
- Traffic Management
- Load balancing
- Security
- Observability
- Service Resilience
- Policy Enforcement
- Multi-Cluster Support
All above features are provided to a microservice by using a sidecar proxy(Envoy) which is deployed alongside of each microservice, intercepting and managing all inbound and outbound traffic.
How to Install Istio on Windows 10 [4 Easy Steps]
Also read: How to Install Red hat OpenShift Local on Windows 10 [6 Easy Steps]
Prerequisite
- Windows Operating System
- Kubernetes Cluster
Step-1: Download Istio Zip File
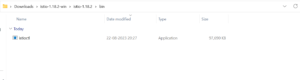
In this step, download the latest stable version of Istio. I have downloaded istio-1.18.2-win.zip. Once downloaded, unzip the zip file and extract the contents as shown below.

Step-2: Find Istioctl Absolute Path
In this step, copy the absolute path where istioctl binary is present as shown below. For me, the absolute path of istioctl binary is C:\Users\linuxnasa\Downloads\istio-1.18.2-win\istio-1.18.2\bin.
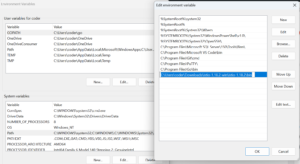
Step-3: Set the PATH Environment Variable.
In this step, modify the PATH environment variable to add the absolute path of istioctl. We can not execute istioctl CLI commands until we add the istioctl binary path to PATH variable. In the taskbar search, Edit the system environment variables -> Environment variables -> Path(System Variables) -> Edit -> New and add the absolute path of istioctl as shown below. Once added Click on ok to apply the changes.
Step-4: Verify Istioctl in Windows
In this step, verify if istioctl is installed successfully. Open command prompt and execute command istioctl version as shown below.
C:\Users\linuxnasa>istioctl version
no ready Istio pods in "istio-system"
1.18.2
Summary
Also read: How To Install Go Extension in VS Code Using 9 Easy Steps
We have installed Istio in Windows operating system. It can be installed on other operating systems as well. You just need to download the correct archive from here and install on corresponding operating system. Once you have the setup ready and up, you can play around with istioctl cli to learn and practice the concepts.