
![MongoDB Tutorial 2 [Two powerful tools Mongosh and MongoDB Compass]](https://www.linuxnasa.com/wp-content/uploads/2024/02/mongodb-2-300x169.jpg)
In this tutorial, we will learn about “Two powerful tools Mongosh and MongoDB Compass”. In the previous MongoDB tutorial, we learnt about how to install MongoDB server on Windows operating system. In this tutorial, we will learn about two more MongoDB tools which are used to interact with the MongoDB databases. Mongosh is a command line interface which provides set of commands to interact with the MongoDB databases whereas MongoDB Compass is a graphical-user interface which also allows users to interact with the databases using GUI instead of commands.
What we learnt so far?
In the last tutorial of MongoDB, we learnt about how to install MongoDB server and configure on local Windows machine. We also learnt about how to start the MongoDB server on localhost. By default, to start the MongoDB server, we execute the command mongod <mongod-binary-path> as shown below.
C:\Program Files\MongoDB\Server\7.0\bin> mongod --dbpath C:\Users\linuxnasa\Documents\MongoDatabases\data
If you notice the way we are starting the server is by first switching to the directory where MongoDB binary is placed and then execute above command. If you execute the same command from anywhere else, the command execution will fail as shown below.
C:\Users\linuxnasa> mongo
'mongo' is not recognized as an internal or external command,
operable program or batch file.
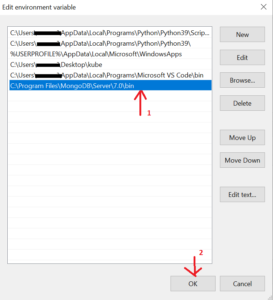
To make the mongod binary executable from anywhere, we have to add the path of binary to the system variable known as “Path.” To do so, open the “Environment Variable” in your machine and add the MongoDB bin subdirectory path in the environment variable as shown below. In my case the path is “C:\Program Files\MongoDB\Server\7.0\bin” so I have added this path.
After you add the bin subfolder path in system variable, open the command prompt and just type the command mongod as shown below. If you get the output similar to below, it means mongod binary can now be executed from anywhere.
C:\Users\linuxnasa> mongod
{"t":{"$date":"2024-02-05T14:08:43.801+05:30"},"s":"I", "c":"NETWORK", "id":4915701, "ctx":"thread1","msg":"Initialized wire specification","attr":{"spec":{"incomingExternalClient":{"minWireVersion":0,"maxWireVersion":21},"incomingInternalClient":{"minWireVersion":0,"maxWireVersion":21},"outgoing":{"minWireVersion":6,"maxWireVersion":21},"isInternalClient":true}}}
............................................................................................................................................
.............................................................................................................................................
{"t":{"$date":"2024-02-05T14:08:45.693+05:30"},"s":"I", "c":"CONTROL", "id":23138, "ctx":"initandlisten","msg":"Shutting down","attr":{"exitCode":100}}
What is Mongosh?
Mongosh is a modern, feature-rich command line interface (CLI) for MongoDB. It provides a JavaScript based shell that allows developers and administrators to interact with MongoDB databases, run queries, perform administrative tasks and more. It offers syntax highlighting, autocompletion and other advanced features to enhance the command line experience for working with MongoDB. Mongosh supports the latest MongoDB features and is actively maintained by the MongoDB team.
What is MongoDB Compass?
MongoDB Compass is a graphical user interface (GUI) tool for MongoDB. It provides a visual way to explore and interact with MongoDB databases, collections and documents. It allows users to perform tasks such as querying data, creating and modifying documents, visualizing schema and building aggregation pipelines through an intuitive and user-friendly interface. It offers features like real-time data visualization, schema analysis, index management and document validation. MongoDB Compass is available in both a free community edition and a paid enterprise edition, with additional features and support in the enterprise edition.
MongoDB Tutorial 2 [Two powerful tools Mongosh and MongoDB Compass]
Also Read: How to Install PostgreSQL on Windows [Step by Step Guide]
If you have reached this far then congratulations. You are now one step closer to start using the MongoDB database. But before we do that, let’s install couple of more tools on our Windows machine which comes quite handy while interacting with the MongoDB databases. We will first install the Mongosh tool followed by MongoDB Compass. So let us look at the steps for each tool installation one by one in the next section.
How to Install Mongosh?
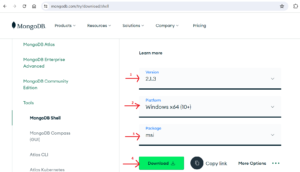
To download and install Mongosh in your machine, click on the link download mongodb shell. Scroll down and select the Mongosh version you want to install. At the time of writing this article, 2.1.3 is the latest Mongosh version. So, I am installing the latest version. Select Platform as Windows since we are installing on windows machine. Also, select package as “msi”. Once selected, click on Download button to download the .msi file as shown below.
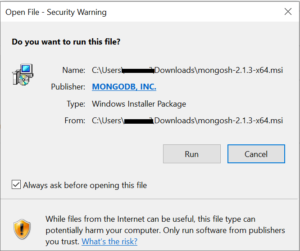
Next, open the Download folder in your machine and double click on the downloaded Mongosh .msi file as shown below.

Next, a pop up will appear as shown below. Click on the Run button to begin the installation as shown below.
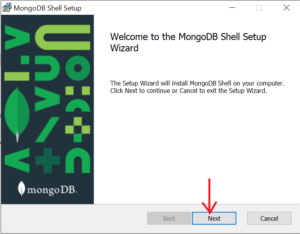
Next, click on Next button to move to next step as shown below.
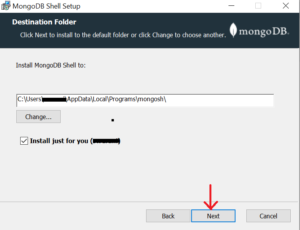
Next, select the destination path where you want to store the Mongosh files post installation. I have left the path as default. Click on the Next button.
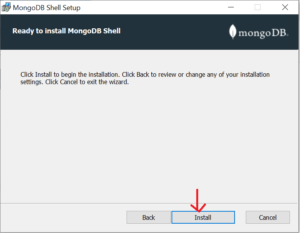
Next, click on the Install button to install the Mongosh.
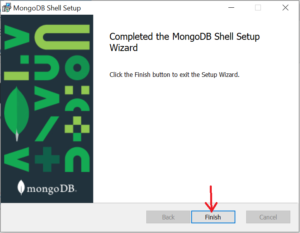
Next, once the installation is done, click on the Finish button to complete the installation.
So we have installed the Mongosh but how do we know if the tool has no error and works as expected? . There are couple of ways to check that. Most common was is to execute the Mongosh binary and check if it opens the prompt to interact with the MongoDB databases. There are further two ways to execute the Mongosh binary. These are,
- Execute via Mongosh terminal.
- Execute via Windows Command Prompt.
Execute via Windows Command Prompt
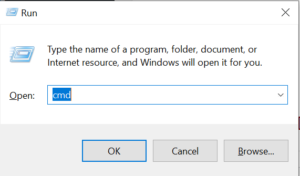
Open Windows command prompt by pressing “Win+R” key and then type command cmd as shown below. It will open the prompt.
Next, type the command mongosh. If the output returns the Mongosh prompt, it means the installation is successful. Also note that by default Mongosh will connect to the MongoDB server which is running on localhost.
C:\Users\linuxnasa> mongosh
Current Mongosh Log ID: 28c739dbacwf1134635snc01
Connecting to: mongodb://127.0.0.1:27017/?directConnection=true&serverSelectionTimeoutMS=2000&appName=mongosh+2.1.3
Using MongoDB: 7.0.5
Using Mongosh: 2.1.3

For mongosh info see: https://docs.mongodb.com/mongodb-shell/

------
The server generated these startup warnings when booting
2024-02-09T10:41:22.344+05:30: Access control is not enabled for the database. Read and write access to data and configuration is unrestricted
------

test>
Next, execute the command show dbs to view the list of all databases. The output of the command will return all the default databases.
test> show dbs
admin 40.00 KiB
config 12.00 KiB
local 72.00 KiB
Mongosh Terminal
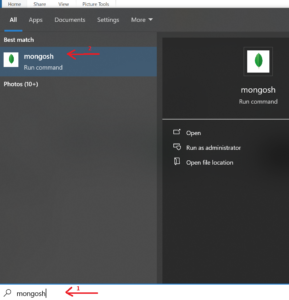
Another way to run the Mongosh CLI commands is by directly executing the command from Mongosh terminal. The steps remains same with the only different that here we will execute all the Mongosh CLI commands on Mongosh terminal itself instead of Windows command prompt. To do so, open the search bar and search for mongosh as shown below. Double click on the mongosh file to open the Mongosh terminal.
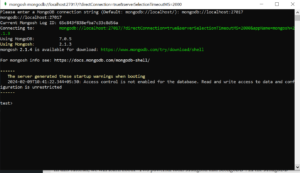
Next, type the command mongodb://localhost:27017 to connect to the MongoDB server which by default is running on the localhost on port 27017. If there are no errors, it will connect to the MongoDB server as shown below.
How to Install MongoDB Compass?
Let us now install another tool which is MongoDB compass. To download, click on the link download mongodb compass and select the version of the MongoDB compass you want to install. At the time of writing this article, 1.42.0 is the latest and stable version. Next, select the platform as Windows since we are installing on Windows machine. Under the Package option, you will only see exe as the option so select this and click on the Download button as shown below.

Next, open the Download folder in your machine and double click on the downloaded .exe file to begin the installation as shown below.

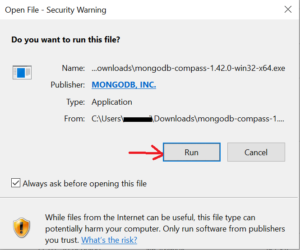
Next, a pop-up will appear on the screen as shown below. Click on the Run button to install the MongoDB compass in your machine.
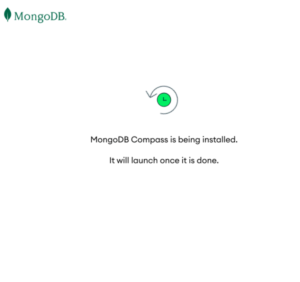
When you click on the Run button, installation will begin and you will see another pop-up which says installation is in progress as shown below. Wait for sometime until the installation is completed.
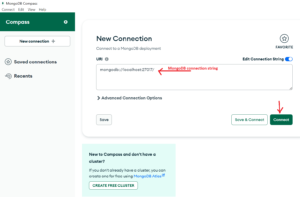
Once the installation is completed, MongodDB Compass GUI will be launched as shown below. Next, let us now verify that the we are able to connect to the MongoDB server using the MongoDB Compass. To do so, click on the Connect button as shown below. Since the MongoDB server is running on localhost, MongoDB compass will connect to the MongoDB server on port 27017.
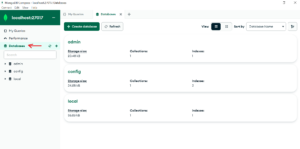
If there are no errors, MongoDB compass will connect to the MongoDB server and fetch list of all the databases from the server. Click on the Databases option from the left panel to view all the databases as shown below. It also shows additional information about each database like the size of database, number of collections and indexes.
Summary
We have successfully installed Mongosh and MongoDB Compass tools which are used to interact with the MongoDB server. Now we are all set to create new databases, collection and implement other important concepts of MongoDB database. We will learn more about these topics in the next tutorial.