
![How to setup Windows Subsystem for Linux [WSL] in Windows](https://www.linuxnasa.com/wp-content/uploads/2023/12/setup-wsl-windows-300x169.jpg)
In this tutorial, we will learn about how to setup Windows subsystem for Linux [WSL] in Windows System. Windows Subsystem for Linux (WSL) provides a seamless integration of Linux functionalities within the Windows environment. Setting up WSL allows users to run a Linux distribution alongside their Windows operating system which offers a powerful development environment. We will learn about two different ways to setup WSL in the upcoming section. So let us get started with the tutorial.
Prerequisite
- Admin privilege required
- Hyper-V and WSL enabled in Windows
If you have not enabled the Hyper-V and WSL feature in your system already, refer to How to Enable Hyper-V and WSL in Windows Machine to meet the prerequisite before going ahead with this tutorial.
How to setup Windows Subsystem for Linux [WSL] in Windows
Also Read: How to Install PostgreSQL on Windows [Step by Step Guide]
I hope you have enabled the WSL in your Windows system already as part of prerequisite. Let us now move to next step. There are two ways available to install any Linux distributions using WSL. These are:
- Install from Microsoft Store.
- Install from Windows Command Prompt.
Let us now look at each method in detail to understand how to setup any Linux distribution using these methods.
Method-1: Install From Microsoft Store
This is pretty straight forward and user friendly method to install any Linux distribution using WSL. You have to visit the Microsoft store that comes by default with the Windows operating system. Next, you will choose the Linux distribution you want to install and press the install button. For the sake of this tutorial, I will install Ubuntu22.04.3 distribution. Follow below steps to install from the Microsoft store.
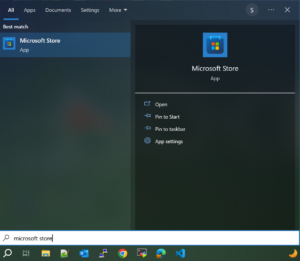
Step-1: Open Microsoft Store
In this step, search the keyword “Microsoft store” in the Windows search bar and open it as shown below.
Step-2: Select Ubuntu22.04.3 Distribution
In this step, once the Microsoft store is opened, search the keyword “linux” at the top and press Enter key as shown below. It will show all the available Linux distribution for installation as shown below.
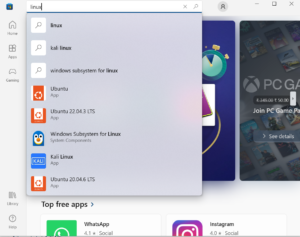
Next, for demonstration purpose, I am installing Ubuntu 22.04.3 version but you can install any Linux distribution from the available options in the Microsoft store. Click on the Ubuntu22.04.3 option and install the distribution as shown below.

Step-3: Install Ubuntu22.04.3 Distribution
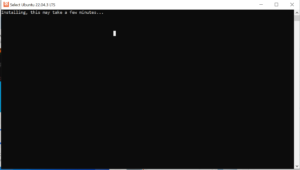
Next, Click on “Open” button to start the Ubuntu22.04.3 installation as shown below.

Next, when you click on the Open button above, wait for few seconds. It will open an installation wizard where Ubuntu22.04.3 installation will progress as shown below.
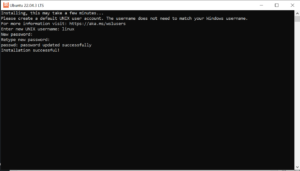
Next, after few seconds, press the Enter key. It will ask you to create a new Linux user. Provide any user name you want to create. I have created the user “linux“. After user detail, it will ask you to set the password for new user. If everything goes fine, installation will be successful as shown below.
Step-4: Verify Ubuntu22.04.3 Installation
In this step, once the installation completes, search for “Ubuntu” in the Windows search bar and open the app as shown below.

Next, login as the new user you had created in the previous step. After logged in, execute any Linux command say pwd as shown below. If you get the similar output, it means Ubuntu22.04.3 distribution is successfully installed with WSL.

Method-2: Install from Window’s Cmd
Another method to install any available Linux distribution with WSL is through Windows Command Prompt. To use this method, follow below steps in sequential order.
Step-1: Execute below command
In this step, we will install WSL. There are two ways to install the WSL. First way is to install the WSL with default distribution . To do so, execute below command.
C:\Users\linuxnasa.com>wsl --install
The operation completed successfully.
Second way is to install the WSL without default distribution. I have choosed this approach for the tutorial. To do so, execute below command.
C:\Users\linuxnasa.com>wsl --install --no-distribution
The operation completed successfully.
Step-2: List all the distribution
In this step, list all the distributions available for installation using below command. There are two ways to list the available distributions. First way is to list the distribution that are installed by default using below command.
C:\Users\linuxnasa.com>wsl --list
Second way, if you have installed the WSL without default distribution, list all the available distributions by appending the flag --online in the previous command as shown below.
C:\Users\linuxnasa.com>wsl --list --online
The following is a list of valid distributions that can be installed.
Install using 'wsl.exe --install <Distro>'.

NAME                                     FRIENDLY NAME
Ubuntu                                   Ubuntu
Debian                                   Debian GNU/Linux
kali-linux                               Kali Linux Rolling
Ubuntu-18.04                             Ubuntu 18.04 LTS
Ubuntu-20.04                             Ubuntu 20.04 LTS
Ubuntu-22.04                             Ubuntu 22.04 LTS
OracleLinux_7_9                          Oracle Linux 7.9
OracleLinux_8_7                          Oracle Linux 8.7
OracleLinux_9_1                          Oracle Linux 9.1
openSUSE-Leap-15.5                       openSUSE Leap 15.5
SUSE-Linux-Enterprise-Server-15-SP4      SUSE Linux Enterprise Server 15 SP4
SUSE-Linux-Enterprise-15-SP5             SUSE Linux Enterprise 15 SP5
openSUSE-Tumbleweed                      openSUSE Tumbleweed
NOTE:
wsl --list, you will get the error “Windows Subsystem for Linux has no installed distributions.”
Step-3: Download Ubuntu22.04 Distribution Archive
In this step, install any distribution from the available list in WSL. I will install Ubuntu 22.04 distribution from the official website cloud-images.ubuntu.com. You can either use curl command to download a specific binary or directly download from the official site. I have use the curl command as shown below.
C:\Users\linuxnasa.com>curl -O https://cloud-images.ubuntu.com/jammy/current/jammy-server-cloudimg-amd64-root.tar.xz
% Total % Received % Xferd Average Speed Time Time Time Current
Dload Upload Total Spent Left Speed
100 392M 100 392M 0 0 9271k 0 0:00:43 0:00:43 --:--:-- 10.0M
Next, verify that the file is downloaded and saved in the current directory using command dir as shown below.
C:\Users\linuxnasa.com>dir
Volume in drive C is System
Volume Serial Number is 1235-810E

Directory of C:\Users\linuxnasa.com

25-12-2023 12:23 411,686,628 jammy-server-cloudimg-amd64-root.tar.xz
Step-4: Install Ubuntu22.04 Distribution
In this step, switch to the path where you have installed the Ubuntu22.04 archive. Next, execute the command wsl –import <distribution_name> <path_to_downloaded_Ubuntu_Image> <downloaded-archive-name> to install the distribution as shown below.
C:\Users\linuxnasa.com>wsl --import Ubuntu22.04 . jammy-server-cloudimg-amd64-root.tar.xz
Import in progress, this may take a few minutes.
The operation completed successfully.
Step-5: Verify the Installed Ubuntu22.04 Distribution
In this step, verify of the Ubuntu22.04 is installed successfully in the system using below command. If you get the similar output after executing the command as shown below, it means the distribution is installed successfully.
C:\Users\linuxnasa.com>wsl -l -v
NAME  STATE                VERSION
*     Ubuntu22.04 Stopped    2
Step- 6: Inter into Ubuntu Subsystem
In this step, after verifying the Ubuntu22.04 installation, inter into the Ubuntu Subsystem using the command wsl -d <distribution-name> as shown below.
C:\Users\linuxnasa.com>wsl -d Ubuntu22.04
root@N-8CP4071DQ7:/mnt/c/Users/linuxnasa.com#
NOTE:
Step-7: Check the Running Ubuntu Version
In this step, once you are inside the Ubuntu subsystem, check the running Ubuntu version by executing below command.
root@N-8CP4071DQ7:/mnt/c/Users/linuxnasa.com# lsb_release -a
No LSB modules are available.
Distributor ID: Ubuntu
Description: Ubuntu 22.04.3 LTS
Release: 22.04
Codename: jammy
Summary
We have successfully installed the Linux distribution using WSL by following one of the methods given in this tutorial. We have also understood the CLI way to install the Linux distribution in Windows system using WSL.